Module 1: PACE and GPUs
PACE is an incredible resource for students at Georgia Tech, providing access to high-performance computing resources and GPUs for research and coursework. It is possible to train very large models (200GB+ VRAM) on PACE. In this module, we will explore accessing the PACE cluster, submitting SLURM jobs, and utilizing GPU resources effectively.
If there is one takeaway from this module that is important to internalize, it is that PACE is different. Being an experienced programmer who is familiar with cloud infrastructure won't help you here. There is a certain formalism to using PACE effectively. If you don't follow it, you may encounter extremely slow storage, stuck/cancelled jobs, and other unexpected behaviors.
Tip
The official PACE orientation videos are highly recommended for all new users.
PACE Cluster Access
Setup VPN
PACE is only accessible through the Georgia Tech VPN. To install the VPN client, GlobalProtect, go to https://vpn.gatech.edu/global-protect/login.esp. After logging in, you should be able to download the VPN client as shown below.
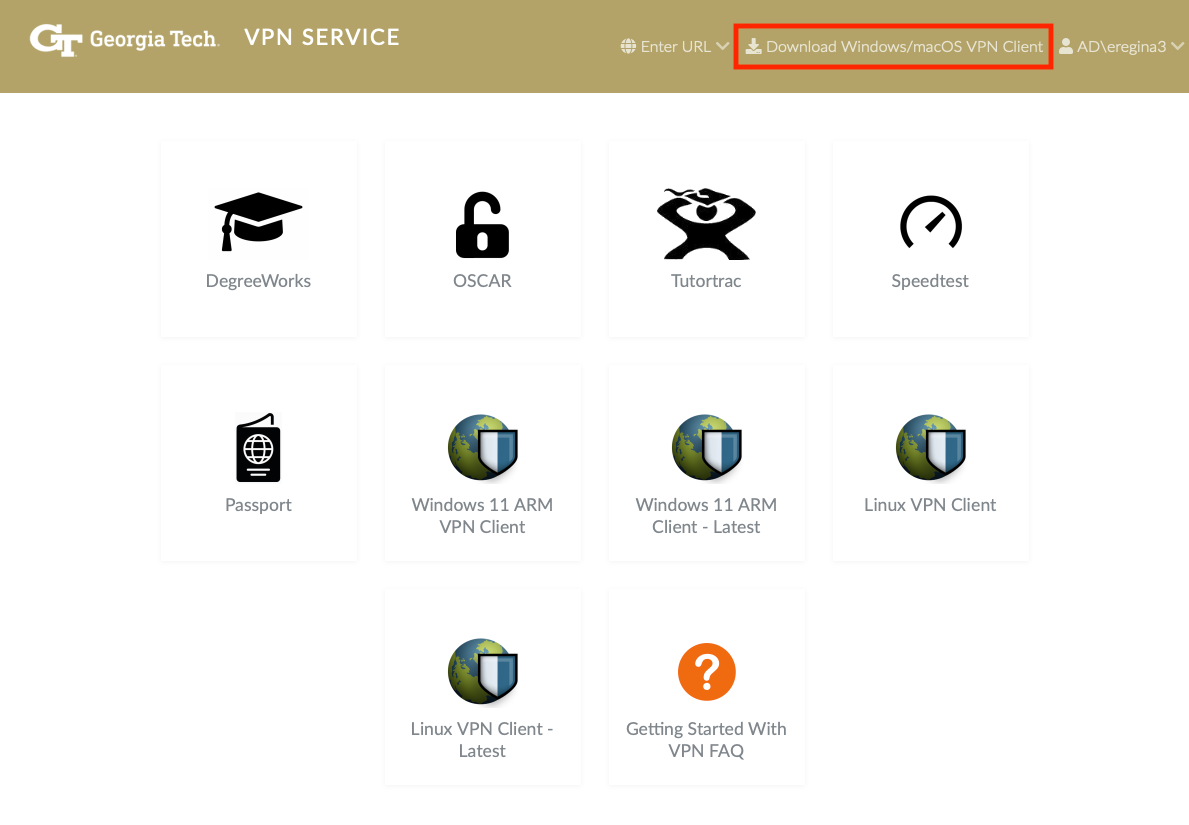
You can also see the official documentation for VPN setup at Getting Started Using the Georgia Tech VPN.
Setup SSH
A Quick Understanding of SSH
SSH (Secure Shell) is a protocol used to securely connect to other computers. What many people know is that the connection is established using an SSH key pair consisting of a public and a private key. What many people don't know is that SSH's security model is really about identities. An identity is a combination of a user and a machine. We assume that a user/machine pair has a unique key that only exists on that machine. If you break the unique user/key/machine assumption, you break the security model. Don't do that.
Important
- Never share your private key. This is the "key half" of your identity and should remain secure on your machine.
- Never copy a private key to another machine. This is the "machine half" of your identity. Each machine should have its own unique key pair. You generate a new one with
ssh-keygen. - Never manually copy your public key to another machine or manually edit the
authorized_keysfile. Usessh-copy-idto install your public key on the remote machine, and usessh-keygen -R <hostname>to remove old keys if necessary. Doing these steps manually only creates opportunities to do it wrong.
Test PACE access
After you have connected to the school's VPN, you should be able to log in to PACE using the following command:
ssh <your_gt_username>@login-phoenix.pace.gatech.edu
You will be prompted to enter your Georgia Tech password, and upon successful authentication, you will be logged in to the PACE cluster. If this works, you are able to successfully log in to the PACE cluster.
STOP
You are not prepared to do actual work on PACE yet. Do not proceed with any computational work until you have read the remaining sections of this module. Failure to heed this warning could result in your PACE account being revoked by the administrators. Read the rest of the page to understand why.
Key Authentication on PACE
If you create a key pair for SSH authentication, you can log in to the PACE cluster without entering your password each time. If you do not have an SSH key generated, you can create one using the following command:
# do NOT add a passphrase when prompted
ssh-keygen -t ed25519
After you have created an SSH key, you need to copy the public key to the PACE cluster using the following command:
ssh-copy-id <your_gt_username>@login-phoenix.pace.gatech.edu
Once you enter your password one last time, your public key will be copied to the PACE cluster, and you should be able to log in without entering your password. Test again with just the command:
ssh <your_gt_username>@login-phoenix.pace.gatech.edu
You should immediately be logged in without being prompted for your password. Lastly, it is recommended that you set up your SSH config file at ~/.ssh/config as follows:
Host pace
    HostName login-phoenix.pace.gatech.edu
    User <your_gt_username>
    SetEnv TERM=xterm-256color
    ForwardAgent yes
You should now be able to connect to the PACE cluster using the simplified command:
ssh pace
GitHub Access
With access to PACE, you will need to set up GitHub access for cloning repositories and pushing your work. In order to do this, we need to create an SSH key for GitHub on the PACE login node. Remember, a private key should only exist on a single machine. Do not copy your private key from your laptop to PACE. Let's make a new one:
# do NOT add a passphrase when prompted
ssh-keygen -t ed25519
Then go to GitHub and add the newly created public SSH key to your GitHub account. To do so, go to https://github.com/settings/keys. Select New SSH key and paste the contents of your public SSH key from PACE into the "Key" field. This should be the output of the command cat ~/.ssh/id_ed25519.pub.
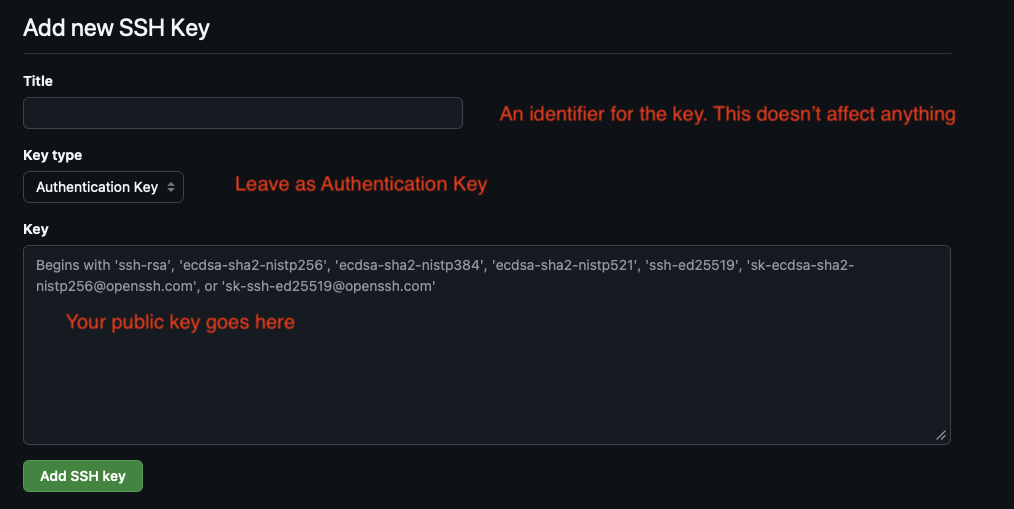
Lastly, set up your name and username in Git by running the following commands:
# Replace with your information.
git config --global user.name "Your Name"
git config --global user.email "[email protected]"
To test if your SSH is set up correctly, try cloning a repository from GitHub using the SSH URL.
git clone [email protected]:dsgt-arc/fall-2026-interest-group-projects.git
Partnership for an Advanced Computing Environment
PACE (Partnership for an Advanced Computing Environment) is Georgia Tech's high-performance computing cluster. In the official documentation, you will see the following graphic and it is critical to understand it.
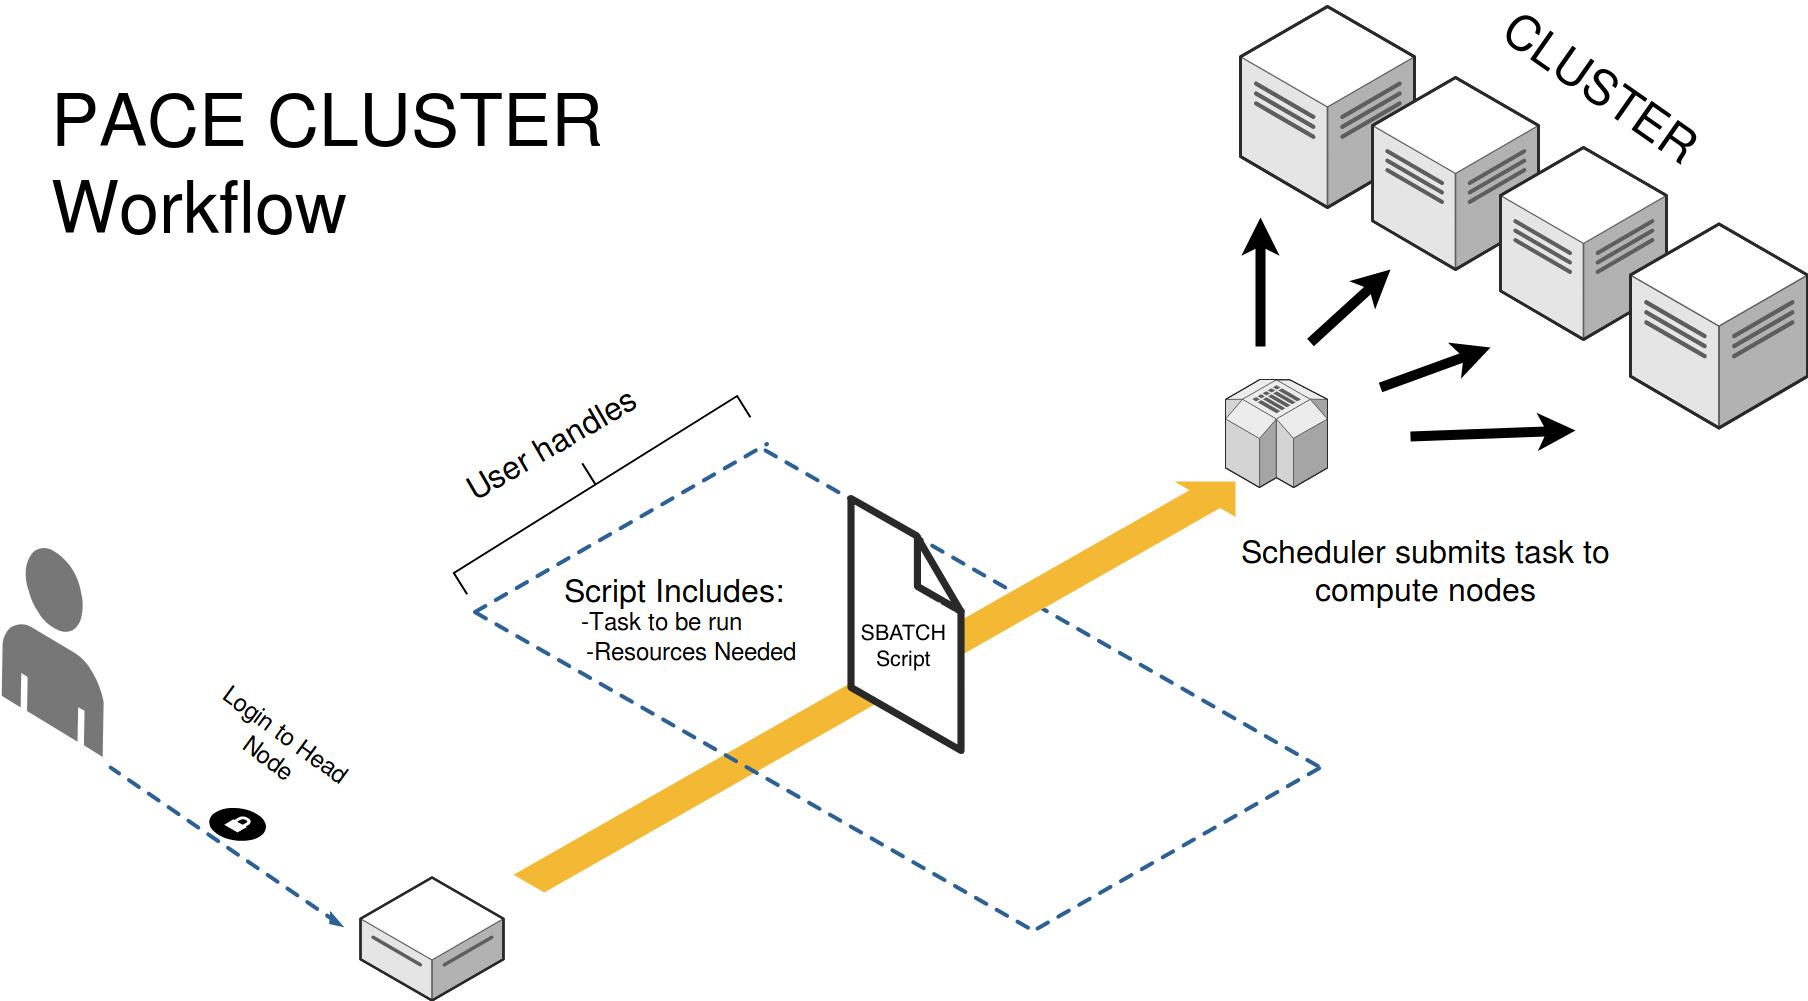
At a basic level, there are 3 concepts you must be familiar with.
- Login Nodes: The entry point to the cluster where users initially log in and submit their jobs.
- Jobs: The job definitions that specify what work (which program) and where (what type of compute node) it will be done.
- Compute Nodes: The nodes where your actual computational work is performed.
Login Node (Never do work here)
When you log in to PACE, you are logging in to a login node of the cluster. The login node is a lightweight node with little to no computational power. Its primary purpose is for users to submit SLURM jobs that the actual compute nodes will pick up and work on.
When you log in, you are far from the only user on the system. At the time of writing, on the login node I currently see:
uptime
 19:51:22 up 11 days,  3:00, 51 users,  load average: 5.53, 4.64, 4.07
51 users logged in at the same time. If you were to run computationally intensive tasks on the login node, it will lock up the login node and prevent other users from logging in and starting jobs. Beyond this being inconsiderate to other users, it is also against the usage policies of the cluster. The system administrators may revoke your account if you violate this rule.
Warning
Never do work on the login node. If you do computationally intensive work on the login node, you risk having your account revoked by the system administrators. We (the course instructors) won't be able to help you.
Below are some concrete examples of what is considered acceptable and unacceptable behavior on the login node.
Definitely OK
- Submit jobs with
sbatch - Check jobs with
squeueorsacct - Move or inspect small files
- Load modules and check software versions
- Read docs and organize directories
- Edit small files with
vimornano
Be Careful
- Use VS Code Remote SSH
- Clone or check out large Git repos
- Briefly compile or test tiny programs
- Run CLI utilities across large code bases, such as
rg,find, linters, or formatters
Never OK
- Train models
- Run GPU code
- Run long Python, R, or MATLAB scripts
- Process large datasets
- Run notebooks that execute heavy code
- Run CPU-intensive compilation or builds
- Benchmark code or run simulations
Interactive Nodes (Edit your code here)
To do more substantial code editing work on PACE, you should use a lightweight interactive node. The following command can request an interactive session on PACE. Although you can use tools such as VS Code Remote extensions, on a login node you may find the performance to be quite slow, especially on larger code bases.
Warning
If you do choose to use VS Code Remote SSH on a login node, be careful about which operations you run. Users have also reported some VS Code extensions consuming significant resources in the background, effectively locking up the login node.
To claim a login node for interactive work, you can use the salloc command as shown below.
# request an interactive node for 2 hours, you can adjust the time as needed
salloc --account=paceship-YOUR_ACCOUNT --nodes=1 --ntasks=1 --cpus-per-task=8 --mem-per-cpu=4G --time=2:00:00 --qos=inferno
You should see output similar to the following:
❯ salloc --account=paceship-YOUR_ACCOUNT --nodes=1 --ntasks=1 --cpus-per-task=8 --mem-per-cpu=4G --time=2:00:00 --qos=inferno
salloc: Pending job allocation 12513338
salloc: job 12513338 queued and waiting for resources
salloc: job 12513338 has been allocated resources
salloc: Granted job allocation 12513338
salloc: Waiting for resource configuration
salloc: Nodes atl1-1-02-002-26-2 are ready for job
...
Take note of the node that was allocated: atl1-1-02-002-26-2.
You can then SSH into the allocated node using the following command on the login node.
ssh atl1-1-02-002-26-2
If you wish to use VS Code Remote SSH, you can connect to the allocated node with the following SSH config:
Host pace-interactive
    HostName atl1-1-02-002-26-2.pace.gatech.edu
    SetEnv TERM=xterm-256color
    User <your_gt_username>
    ProxyJump pace
    ForwardAgent yes
    StrictHostKeyChecking no
Note the use of the ProxyJump above. You cannot directly SSH into any non-login node, so you must go through the login node specified by pace. You must have set up
a pace host entry in your SSH config as we did earlier for this to work.
Compute Nodes (Run your code here)
Compute nodes are where you actually run your code on PACE. Unlike login nodes, compute nodes are meant for heavy computation and can be requested through the SLURM scheduler. You typically do not log in to compute nodes directly; instead, you submit jobs using sbatch by directly submitting a .sbatch file.